Saturday, January 15, 2011
Who says valentines are just for kids?!
I have always really liked Valentines Day! With someone or single-who cares?! I see Valentines Day as a day to celebrate relationships/friendships and tell your buds/family how much you love them! I know...it sounds cheesy, but that's me!!!! ;)
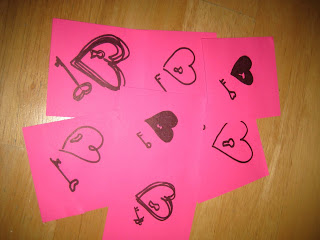
This year I decided to try and make my own valentines by making my own clip art! I made a cool valentines design on card stock using cookie cutters as stencils, Crayola mini stampers, etc.and then took a picture of it.
I saw a stamp that I really liked in a Martha Stewart article and practiced drawing it on pink post-it's. I thought the design looked cool so I took a picture of it too and then used a pant program to make the background space pink to match.
I uploaded my 2 valentinesy pictures to Walgreens.com photo and selected to have my pic's printed out as "wallet size". When I picked them up there were 4 of the same images on 2 4X6's:
I cut them out and played around with different colors of card stock, shapes, and placements.
I used double-sided tape to stick everything together-I think it works better than glue ;)
Now I have some clever Valentines clip art that I made myself (!) and can use again and again in different ways. Along with sending out cards in the mail, I might send out a "handmade" email wishing friends V-Day happiness and use the pictures in the email to warm up my message!
Wednesday, January 12, 2011
Home Made Brownies! Easy, Clever, and I'm Never Going Back to the Box!
Preheat your oven to 350 degrees.
Mix 1 stick of very softened (room temp or it will cook the eggs) salted butter, 4 eggs, 1/2 cup of vegetable oil, and 1 teaspoon of vanilla in a large bowl and set aside. I used a fork to break up my eggs really well. (To soften it, I leave my butter out for an hour or so or I nuke it for a minute and then let it cool to room temp.)
Next mix together 2 cups of white sugar, 1/2 cup of bakers chocolate (powder), 1 cup of all-purpose flour, 1/2 teaspoon of baking powder, and 1/2 teaspoon of salt really well with a fork in a medium bowl and set aside. Why a fork? Because I don't have a whisk or electric mixer and spoons/spatulas don't combine dry ingredients as well ;)
Add 1/3 of your dry ingredients to your wet, combine well, and keep adding a little at a time then mixing until the dry's gone. Lightly spray a 9X13 inch deep pan with non-stick spray, add your brownie batter, and stick it on the top rack of your oven for 25 minutes. My oven cooks things crazy quickly (sometimes burning them) so it might be a little longer for you-when you can stick a knife in the middle and it comes out clean, it's done.
As soon as take the brownies out, use a knife to go around and loosen up the sides and make your cut lines. Let them cool in the pan for 10 minutes. I found if I cut right away it's easier to get them out than if I do it later.
Enjoy :)
Subscribe to:
Posts (Atom)