Monday, September 3, 2012

What to do with all those cute clippies!


If you love clippies as much as I do, you (like me) probably have an impressive collection ;)  My clippies used to be all over my sink, on counters, etc. until I Googled hair clip storage and learned about bow boards.  As you can see, bow boards are framed boards with ribbons on them that you can clip your clippies onto.  Genius right?!  

I love this idea, but decided on an easier, but similar project for today; which I call a Clip Strip!  

What I did was find a wider piece of ribbon that I liked, figured out how long I wanted it to be, and hot glued a Command Picture Hanging Strip to the back of the ribbon.  I opted for the strips instead of a thumbtack or hook because I want the clip strip to stay on the wall when I take clippies off.

The Command strips velcro to each other and create a strong seal: 


I hot glued the ribbon and strip together so that the bond would be strong between the fabric and the adhesive and not fall off my wall: 

Next steps: vertically adhere your Clip Strip to the wall with the Command strip and secure your clippies! :)

A+ Accessory Storage!


Empty oatmeal container=clever headband storage! 

Recently I've started wearing more headbands, and I've been trying to find a good way to store them all and keep them looking nice. I Googled headband storage and found this great idea from Makoodle.   

This project includes an empty oatmeal can, batting (or I used fleece), hot glue gun (yes I cringed too, but I found a good one that doesn't burn!), cute fabric, and ribbon.  

When I first saw Makoodle's 'how to' I have to admit that I was not super excited about a fabric craft because I haven't used fabric in a lot of crafts.  I wrote a list of what I needed and headed to my local Joann's Fabrics store.  I didn't know where to start so I told a very nice store associate what I wanted to do and what I needed.  She introduced me to the remnant section where I found a piece of fleece that worked as my batting:


Then I found my way over to the fabrics and picked up some fabric quarters I liked (cheaper than buying yards):

Then, I went in search of the most feared item on my list: the hot glue gun!  Chuckle as you may, I have memories (and scars!) of when I was younger and used the hot glue gun for projects-ouch!  Very happily I found a 'Cool Shot' which is advertised to be safe and cooler than other guns.  I have to tell you that it was a little more than a regular glue gun, but so worth it!  Even when I accidently touched the 'hot' glue, I did not get burned :)  Magic!  

Once I got home, I cleaned out my empty oatmeal can with a damp paper towel and got to batting!  I'm big on eye-balling my measurements rather than writing them down so that's what you see below:

Then I got to 'cool' gluing ;)  I did two layers of the fleece:

I kept room at the top so that the lid could still fit.  This way I had extra storage inside the container:

Then I glued the fabric onto the fleece:

Tada!:

Then I glued a ribbon around the top and seam of the container:


I attached a mock handle on the top of the lid for extra detail:

A place for everything and everything in its place :) :

P.S.: Check out all this room inside the container!:

Sunday, February 12, 2012

Cocoa Crispy Treats (I'm almost positive that they are 100% gluten free!)


I'm going to an all day training tomorrow for work so I thought it'd be fun to bring a treat to share with my comrades ;).  One of my buds can't have gluten so I challenged myself to make a treat that she could have and we could all enjoy together.  


I researched online and finally decided on rice crispy treats!  The articles and comments that I read told me that butter and marshmallows are typically gluten free, (readers correct me if that's wrong please!), so that just left the crispies.  


I set out looking for crispies that were gluten free and finally found them at Whole Foods (Kroger and Target didn't have any).  I bought a box of Enviro Kidz Organic Koala Crisp cereal and set to work.


I melted 4.5 Tablespoons of butter in a deep pot, and then melted 6 cups of mini marshmallows (1 bag) in the pot.  I transfered the mixture to a large bowl that held 6 cups of Koala Crisp (1 box) and stirred until everything was combined.  I then transfered the sticky deliciousness to a greased pan.  


There were a few crispies left in the bowl so I did a taste test and found out that Koala Crisps are cocoa flavored (surprise!)  When I originally opened the bag I could tell that the crispies were darker than other kinds I've seen, but I thought that was just because they were gluten free (you can tell I'm very new to the gluten-free world!!!)


Since I was a kid I've always loved this treat, but let me tell you, cocoa is the way to go go!!!  The chocolately-salty-buttery-marshmallowy taste is sooo yummy!  Gluten free or not these are some of the best rice crispy treats I've ever had!  Try it out for yourself :) 


P.S. Are you looking for gluten free candy?  Here's a list of gluten free Valentines (and other) candy! 

Sunday, October 16, 2011

Tie, Tuck, and Twist Your Way to a Great Fall Look!

In the fall I love pulling my scarves out of storage and thinking about which cooler weather clothes to pair them with.  Each year I've worn them in pretty similar ways, but this year I wanted to try out some new cute styles.  

The first style that I found and really liked is called the Four in Hand:


It's a just a little bit different than the classic slip knot that I usually do with this scarf:


Another style that I think looks sweet is the half bow:


It adds a little bit of drama, but still looks very stylish.


Scarves.net offers over 37 different ways to tie scarves.  You can peruse all of them by viewing their short video clips.

Check it out and try a new, clever style for yourself today! :)  


Wednesday, September 21, 2011

Cute and Easy Halloween Craft


Halloween is my favorite holiday :)  It's during my favorite season and it just seems like the world is a little more creative and fun this time of year.  

 Lately I've been checking out all of the awesome Halloween projects on Craft Gwaker and Dollar Store Crafts and have been inspired to create my own spooky craft ;)


I was able to purchase the items needed for this craft from my local dollar store:


Glass votive holders

Battery operated votives
Halloween ribbons
Googly eyes

 In addition to the items above I used double sided tape and thinner Halloween ribbon to create my spooky candle holder.

This is the Halloween ribbon I found. It was a little wider than the votive holder was tall so I cut it down to fit.


I used double sided tape to secure the ribbon to the votive holder.  


Then I attached (double sided tape again) the thinner ribbon to hide the seams...


And to hide the fringe that came off the wider ribbon after I cut it.


I dropped in my battery operated votive and thought I was done...


But then I saw my googly eyes and thought, 'hmm, this could be a little cuter!'  So I covered the jack-o-lanterns' eyes with the googly eyes (using little bits of double sided tape).


I have to say that it turned out pretty good!  Clever even ;)


I hope you try this project out for yourself :)  

Note: I made these for a battery operated votive candle so I don't know how the tape and googly eyes will react with the heat from a real candle.  

Saturday, September 10, 2011

Perfect Party Drink for True Blood's Season 4 Finale or Your Halloween Party!

My friends and I love the HBO series True Blood based off of the infinitely better book series by Charlaine Harris, The Sookie Stackhouse novels.  Each Sunday night we excitedly wait for an episode to air (like vamps wait in their coffins for the sun to set!)


Recently we created the most temping drink to sate our thirsts before the show started.  ;)  (I'm really getting into this vampire theme)!  We call it V (it's what Vampire Blood is called on True blood).  


V would be great for your own True Blood party/marathon or upcoming Halloween party!


Start by making 1 large box of your favorite flavor of any red jello (cherry, strawberry, even raspberry can work great!).  Strawberry was our favorite flavor to use.  


Let the jello set up until it's jello and then deposit spoonfuls of it onto a flat plate (we found that making the jello in a casserole dish cuts out this step).  


Use a fork to go through and make 'vampire guts' (what True Blood's director Alan Ball thinks vampires look like when they meet their demise).


Spoon the vamp guts into clear cups.


Then fill the cups up with your favorite fizzy red drink (half jello, half fizzy drink).  In our trials we tried sparkling blood orange and sparkling cranberry and then Faygo red pop.  Faygo won!  It tasted the best with our strawberry 'guts'.  


Mmmmm, bloody!  


This taboo drink was easy to make and waaay fun to drink; probably a good one to make with kids as well :)  If you wanted to add a little adult into the mix you could probably follow a jello shot recipe for when you prepare the drink's innards!


Until next time, enjoy your V and the season finale of True Blood season 4!


Note: Me (left in the black and coral) and Arika (mid-right in the white and blue) worked together to perfect this recipe. Our men happily volunteered to be 'scary' in this photo ;).  Check out Arika's blog, Happy Home!  


Friday, April 29, 2011

You know you make me want to Grout!

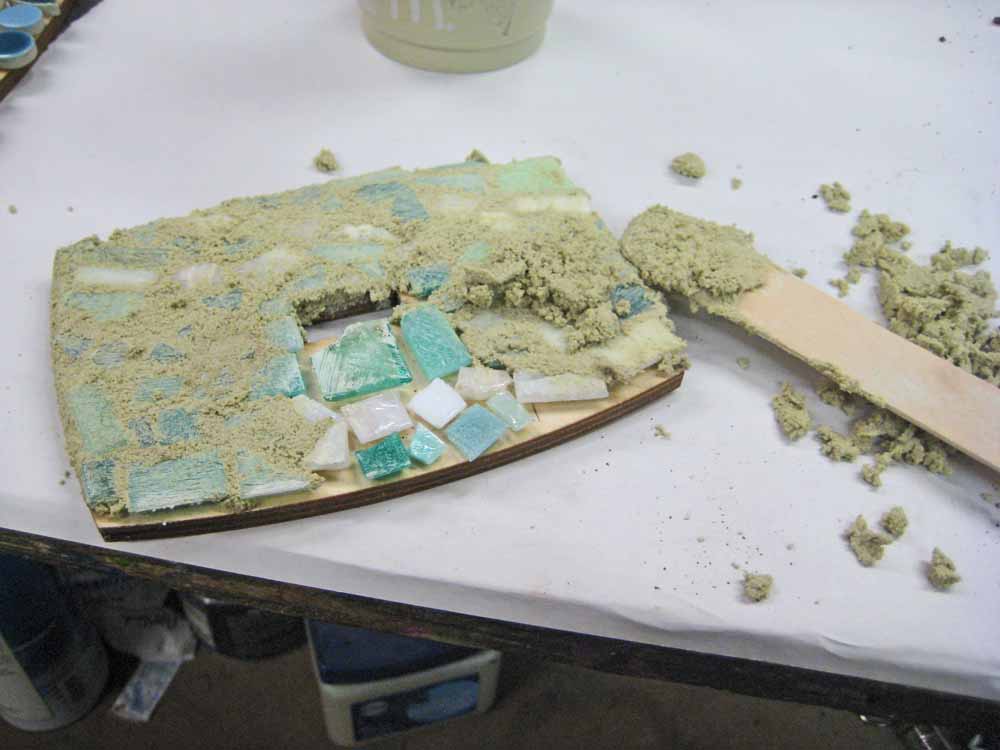
My mosaic pieces have been grouted!  The whole process was a lot easier than I thought it would be.  Basically you make brownie mix consistency grout by adding whatever color dry grout you want and water:


Then you cover the piece with the mix:


I used a popsicle stick to spread the grout on:


let it sit for 5-10 minutes and then wipe off the excess with a dry cloth:


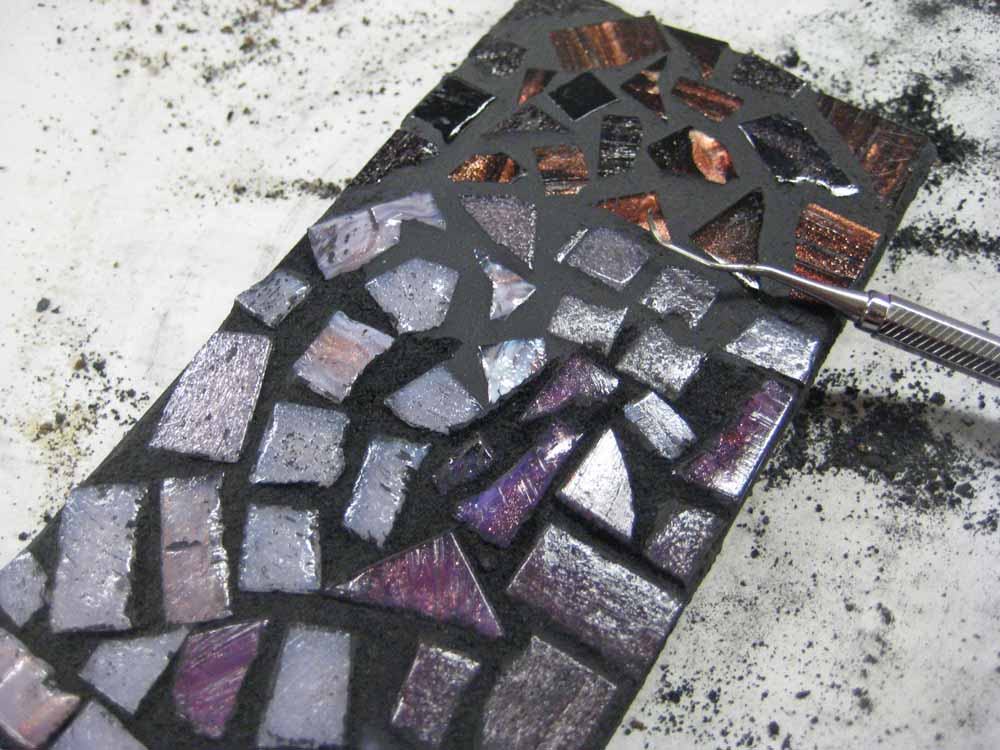
Sometimes you want to make your glass underneath stand out more so you can go through after it's dried & you've wiped it to define the shapes better with a sharp tool:


Fun fun!  Looks like some moms I know are getting some nice Mother's Day gifts....

Monday, April 25, 2011

Some pretty eggs! :)


This year I decided to try 'marbling' my eggs and I think that they turned out great!  


I started with a plan old egg dyeing kit and dyed almost all of my eggs a lighter color

Then I dumped about a table spoon of vegetable oil into the dye and mixed it up.  


I re-dyed the eggs in different colors and the oil spots made some cool effects!


I hope this post inspires you to try this too!  When is eating fun colored eggs not in season? ;)