
Alright, this is not a completely original, clever idea. I first heard about doing something like this on dollarstorecrafts.com (great site-check it out!!!)
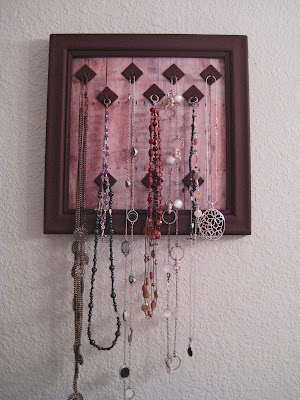
This is a picture frame bracelet and necklace organizer. I like it because it keeps my jewelry tangle-free and displays it like a piece of art.
The background to my frame is just a cool piece of scrapbook paper that looks like planks of wood. When you're picking a piece of paper out for your organizer, find one that you love and will be happy to look at everyday. Also, you might want to take into account what will match the decor of the room that you're placing this in. This piece is in my bathroom, which is primarily browns so this matches perfect!
To make one for yourself, you'll need:
-Picture frame (I got a larger one like this from TJ Maxx for I think $.50 because the glass was cracked. That was perfect because you don't need the glass for this!) You could also thirft it up!
-A piece of scrapbook paper that will fit the size of the picture frame (cut it down if you need t0). I got my paper from Jo Ann's for cheap, but I think the dollarstore sells scrapbook paper too
-Plastic hooks that will be small enough for your clasps to hang on (3M might be too big)
-Gorilla glue
-Paint and brush (optional)
-Picture hanging hardware (nails, screws, etc.) (optional)
Start this project by taking the glass (recycle or save for another project you come up with) and cardboard backing out of the frame and then painting the frame and hooks if you so choose.
Take the backing and put on top of the scrapbook paper. Trace the backing so that the paper is the same size as the backing. Make sure your scrapbook paper will be "right side up" and then glue the paper onto the backing.
Put the backing back into the dry frame, figure out where to put your hooks, and then glue those on too, (some hooks come with an adhesive strip, but to be safe dot the adhesive with a drop of glue). Vuala! You have yourself a jewelry organizer! Don't you feel clever?!
Use picture hanging hardware to hang the frame (make sure you hang it high enough so that your necklaces don't hang over light switches and things). Or some frames have a pullout stand so that you can place this on your sink, dresser, etc. Great job!


